Monday, June 19, 2017

Engine Mount & Landing Gear


Section 46 is pretty exciting.  The thought of people not confusing your plane with some type of boat, canoe or downhill racer is a real milestone in the project.  I was especially antsy about this, not so much just because I wanted to get it done but I had angst about putting the plane on some type of platform in order to slide the gears in.

Engine Mount


I installed the engine mount way before I was finished with the doors. I vaguely remember I had some more building time but was waiting on some epoxy to cure so did I went ahead and installed the mount. Doing it by myself was doable but in hind site it would of been a lot easier with two people  Match drilling the mount holes wasn't hard but a bit time consuming because you're shooting through steel.  You also have to man handle the mount a bit to get it 'flattened' out enough to line up with all the holes. Next is just bolting it on which was a challenge without another person.  It did require another person though when I had to tighten the bolts to their final torque. Qualifications wasn't an issue as my 11 year old son helped me with that.

Landing Gear


This section is another one in which you have some good choices.  To each their own but I went with Matco Brakes, front axles, axle nut extensions, Plane Around spacers and Dresser Retreads.  I could type it all out and show how things went but that would be a bit of plagiarism since I went off of another build.  Here is what to order and how it all goes together.  Even with that write up there are still a few hours spent staring at the parts.  Once I had it figured out it was pretty easy.  I did replace all the nylon lock nuts with all metal lock nuts, cost maybe $5.

To get the gear struts in you need to raise your project off the ground and put it on something.  I decided the moving workbench I've been using during my entire build would work great.  I summoned three neighbors to come over and as a feat of strength get this onto the workbench.  Took the four of us and a friends wife to push the bench under. It was fairly stable, I wouldn't go dancing around on it but it was high enough to do the trick.


Inserting the gears can be a bit of a bear.  Each weigh about 40 lbs and are an extremely tight fit.  I ended up using gear grease and a lot of turning and pushing to get them up.  Using a screwdriver in the top hole works well to ensure they're in the right position.  Then you have to use a random special drill bit size and bore the hole out more. The size is exactly 7.9mm... you can get one from around $5 and it will probably be the first and last time you ever use this.  This idea is to remove all play in the bolt I suppose.  Should note the plans talk about lining the bit up and then putting it on the drill because of space constraint.  Maybe I ordered a short bit because I was even using my large cordless drill and I had no issues.

The plans also call for you to install the gear dry, drill then pull it out and deburr everything.   Working with steel parts previously on this build I know anytime you take it back apart you run the risk of not getting it together the same way. After I enlarged the hole I deburred with several methods knocking off or sanding any area's of concern.  Then I wiped with a towel and used compressed air to clear it all out.  The bolt is very snug taking a few wacks of a mallet to get it all the way through.  Then just torque it up and you're done.


Mounting the brake assemblies was a bit tricky for me.  Could be that it was 2 am when I was doing this but for whatever reason I was confused on the orientation and actually had them on the wrong sides, which looked strange to me because the brake caliper was in front.  I ended up going to bed, catching the mistake the next day and swapping them.

Mounting of the tire is straight forward as well.  I put the tires together I think the afternoon I got all this stuff and they spent the remaining time in the corner of my garage.  I did take them to the shop though and have them professionally balanced.  Unless you can balance them yourself I would highly suggest taking them somewhere before you put them on the plane.  I fly a 172 with out of balanced tires and you land at anything over 60 knots it shakes quite a bit.

The biggest challenge of this part is actually mounting the axle nut, which I had to do twice for each tire (Will get to that later).  The idea is that your secured axle nut will have a hole drilled through with a cotter pin.  Now you can't drill this hole with the tire mounted and you don't know how much to tighten the nut without the tire on so a bit of a conundrum. Van's solution which works is to put the nut on where you want it and then mark it and count the turns to remove it.  Take the tire off then put the nut back on to that spot and drill the holes. Using the Matco setup and all their spacers makes your entire assemble a bit wide. I'm not sure how common it is but when I drilled my cotter pin holes they actually ended up being notches about the width of the drill bit.

For those that have never put a free spinning tire on, it goes something like this. Take one hand and spin the tire and your other hand tightening the nut until you can feel the resistance.  like this on something there's a bit of a technique on knowing how tight to make it.  You'll want the tire to freely move but at the same time tight enough that there's no lateral movement. Typically you hand tighten the nut as much as you can and then back it off.  However Matco has specific instructions on how to do this with their set up and instead of backing it off, you advance it one nut space.


So in the above photo I installed the wheel pant extension per the plans.  It then occurred to me there was a highly suggested aftermarket piece that greatly reduces the chances of having your wheel pants collapse.  The kit is worth it from a price perspective and can be found at Cleaveland Tools.  The idea behind the kit is a wider base on the extension piece and an AN5 vs AN4 attachment bolt for increased strength.  It even comes with some replacement cotter pins, but they're a bit longer than the plans version and I ended up going through about 3 extra's when installing the wheel a second time. The kit took just over an hour to get installed and a majority of that was wrestling with the axle nut cotter pins.


Kit Contents

Final install


Nose wheel installation went well.  I struggled with one step where you need to compress the bushings enough to install the cap on top.  I tried pushing and pulling and in the end used racket tie downs to get the compression.  Might not be the safest thing so if you do this go with larger tie downs than I did.

Another issue is getting the 26 lb lateral resistance on the nose wheel.  Using a fish scale I was able to measure the resistance.  My first attempt was around 18 lbs.  So I tighten it one notch and now it's 40 lbs...  I assume it will loosing a bit as the cup washers get crushed a bit, so I left it at 40 and made a note to check on final assembly.


Compressing the front

Fits out the garage door.

That's really it for section 46.  In the below picture I took all the tap and plastic off the windows and cleaned everything off.  I'm going to spend some time removing a few scratches and getting the window edges a bit better.  I'll post about that later.


Monday, June 12, 2017

Cabin Doors & Transparencies - Part 4 "The exciting conclusion!" with Bonus Section 45A

After 150 hours or so of fun, frustration and learning my journey with section 45 is coming to an end.  N10JW now has functional doors, a windscreen and windows! For write up purposes I split the Doors, Windows and Cabin top into separate sections but they are very much intertwined activities.

The time spent on this section was a round robin routine of trimming, sanding, filling, glassing, sanding, filling, priming, filling, painting, filling, sanding... you get the picture.  Some areas were more of a challenge due in some part to my own mistakes or oversights.  I also increased the difficulty over a regular plans build because of added parts such as the 3rd door cam latch, flush exterior handles and the McMaster Carr Door Seal. At the end of the day that's what is great about experimental aviation and that you can customize your build how you want. The doors are literally something that you will use at least twice every time you fly so you want to be happy with what you did.

Cabin Doors

Last I posted I had the doors initially fit and working but still there was still plenty of details I had to work out before calling them 'done'. After I completed the door flange trimming so I have an even 3/16th gap around the cabin top there were several places on the doors that I had to reepoxy. I just mixed up some flox and pushed it in with a stir stick.  I tried to use a syringe but found that more trouble than it's worth.   I also didn't like the gaps I had where I installed my delrin door ends. Using some tape as a barrier filled the gaps with some micro, let it sit a few and then topped the area off. Seemed to work well and gives it a more finished look.

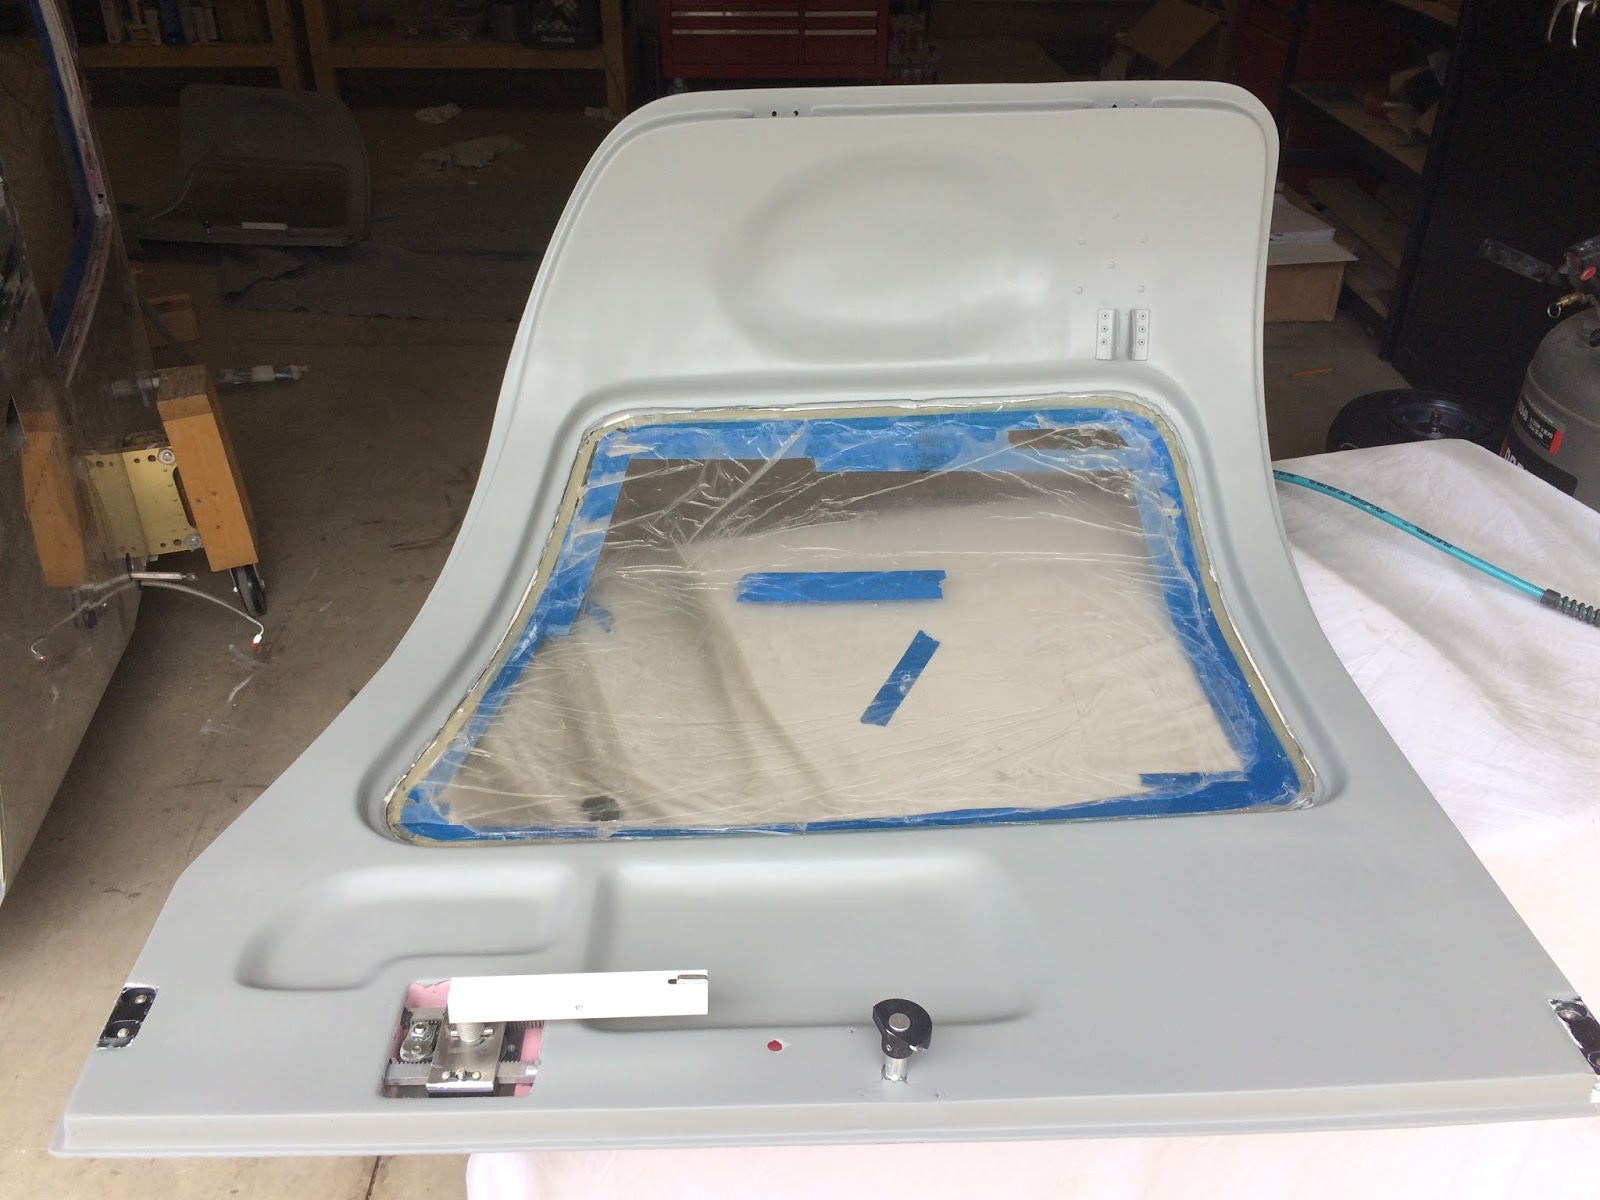
Finishing the inside of the doors I filled any noticeable gaps while sanding out any random rough spots and slapped a skim coat of straight epoxy over the entire inside to get ahead of any pinholes. After curing I blocked out with 120 and then had to use my fingers and some scrap to sand the flanges and nooks on the door.  Then it was back to learning...


Up until this point I had finished all my fiberglass with straight epoxy wipes.  This went well in battling any pinholes, or other imperfections.  On the cabin top inside I had experimented with some high build primer which worked great once I figured out how to use it correctly.  For the doors and external cabin top I decided to up my game and try out a new product- Poly Fiber UV Smooth Prime.

This stuff was suggested by a few builders on the forum but was said to be more of a filler than a primer.  There were plenty of mixed reviews and methods of application; some sprayed it, or rolled it, some hated it and some thought it worked great.  I decided to roll it using small foam rollers and some foam brushes.  The idea behind it is you do 3 light coats rolled on, allowing it to dry in between coats, sand it and then do another 3 coat.  Apparently the key is to let it dry really well. Experimented with the first coat and it seemed to take about 10 mins to dry to the touch.  So put on 3 coats and let it cure over night.

UV Prime
The next day I spent some time sanding this stuff... by 'some' time I probably have a good 6 hours of sanding the doors and cabin top.  This stuff works really well but I didn't have a ton of pinholes.  So rather than doing another batch I decided to push on.  I could of done the second round of 3 coats but not having many pinholes I didn't want to needlessly waste 6+ hours of applying and sanding this stuff.

With the doors I taped them out and applied my first 3 coats of regular rattle can primer.  This is a great way to see any problem area's that you miss and allows you to do any filling or sanding before you get further down the paint process. Here's where I battle with my perfectionist mentality....  I would love to have completely flawless doors, however it's a battle to try to do this.  I had this same issue with the cabin top.  I would find some little micro flaw in the fiberglass and want to correct it. How I dealt with this on the cabin top interior which translates well to the doors and external areas is stand about 3'-5' away.  If whatever I have an issue with isn't noticeable at that distance then I move on.  If I can clearly see it then I'll work it out.

Post some micro patch work and sanding I hit it now with several coats of the high build primer and let that cure over night.  The next day I again looked for area's of concern, did some more sanding and filling and got it prepared for top coats.  For top coats I did 4 coats of color, wet sanded with 1000 grit and then 3 coats of the low-luster clear coat I've been using.  Then again wet sand with 1000 grit and it gives it all a nice finish.

Coat of primer

Post sanding

Post 3ish light coats High Build Primer
4 coats color
3 coats clear
 I think the doors turned out great.  They are not 'Perfect' but they look clean, the color turned out well and there's no major flaws on them.  There is a bit of a textured look to them which helps to blend in minor imperfections.  At the end of the day they'll work well in the plane and will be easy to fix down the line when they get scratched from use. If I had to critique my work I could of done a better job in the rattle can painting department.  You can noticeably see some area's are more shiny than the others. Once I add the final touches on the inside like the handle cover, some window trim and black out some of the white area's on the Delrin it will look much better.


Tape Removed, will install finishes later


Transparencies and Cabin Top Finishing

Hard to document this process.  I bounced around on various tasks for practically months.  The issue is you might work for an hour and then have to wait a good 18-24 hours before you can work on that part again.  The windscreen fairing for example involved a good 3+ coats of micro, 4+ coats of epoxy and an applications of UV Smooth Prime.  Plus there were some area's I refilled and patched filled and what not. If done on consecutive days it would still probably take a few weeks.

Getting into it from the rough layup around the windscreen involved me making a sanding block out of a scrap piece of wood that was approximately a 7" radius.  This is what I used along with some adhesive sand paper to start the process.  This gave me a rough curvature and showed me just how much micro fill I needed (A lot).  Mixed up about 3 servings of the stuff and lathered it on really thick around the entire fairing.  I think covered it with Tin Foil and using the sanding black pushed it all down into place.   Now in hindsight I should of put peel ply down and then the foil but was under the assumption that the shiny side of the foil wouldn't stick... that wasn't the case.

After curing and picking out all the little pieces of foil I hit it again with the sander, much better shape but needed more fill.  After a total of 3 iterations it had a decent shape.  I then blocked out the sides and worked that transition from the sides to the fairing which is more of an art project than building.  After that I tossed down a straight epoxy coat that I had dyed black to really show any low spots (Low spots won't be shiny when sanded).  Once that was done I put on some white micro to fill in any low spots, let cure and then sanded again.  Using a flash light and my hands I went over it once again and felt it was time for the epoxy coats.

I applied 3 fairly thick coats with a brush and sanded in between each with 120.  After 3 coats cured and sanded I moved back onto other parts of the cabin top.


Final sand and cleaning prior to epoxy coat

First coat

My approach to the rest of the cabin top was to first finish out the door frame.  Like everything else when dealing with fiberglass this was a series of steps that included sanding, micro, epoxy, ect. Since I had the 1/4" gap I wanted between the door and the flange already that mean any material removed or added had to come from the back of the frame. The original plan was to have the flange 1/4" thick for the gasket.  The problem though is I had already finished the cabin top interior so building on that would cause a blending issue, not to mention a lot of refinishing, which would be more challenging given the the top is secured to the fuselage.

What I decided to do was scrap my original seal which was fairly beat up anyhow from previous installations on larger that 1/4" thick flanges. Instead of going with the original one I previously ordered I picked a new one, the only difference being that it only requires a 3/16" flange.  Going this route saved me from having to build up a large area on the back of the flange and instead allowed me to just sand down the back of the flange to get the 3/16th consistence... and hey maybe I saved some on weight too!! I did however still have refinishing part of the inside area for the flange but really not much more than 3/4". Taped it out, went through the sanding, filling, painting sequence and not it looks good if not better than it had before. For the time being the seal is just slipped on. Post exterior paint I will use some silicon sealant just as an extra moisture barrier.

Flange with Seal on
Top

3rd latch Cam with door secure
Moving onto the rest of the cabin top you just have to realize it looks extremely large but the largest area's are easy to block. So in reality the sections you have to focus on are the area's around the windows/windscreen, the door gaps and elevations.  This still takes quite a bit of time and literally kept me up at night. To help keep myself in check I focused on area at a time, otherwise I felt rushed to get to the next section.  So I would work out a window, then take a break... move onto another one, or wait till the next day.  This round robin routine helps keep the project moving and before you know it you're finishing out some sections.

The door gap was a back and forth event as well.  I wasn't 100% sure what I wanted to do with the cabin top edge and how I wanted to space it out.  What I ended up doing was building it up and essentially squaring it off with some micro. Then I used some scrap aluminum which was about an 1/8" round and just held some sand paper in place and used it as a guide.  Worked out moderately well, still ran some 320 over it and did a skim coat along it by hand. To get the door gap spacing I used a 'gator' pad and a small pieces of thin cardboard and just ran it around until there was around a 3/32 or so gap.  This is probably +- 1/32" in some areas but post paint I doubt it will be noticeable at all.

Rounding and gap

Uniform gap

The rest of the time was spent working all the edges, to include removing the first layer of tape I put down. I had to feather with some 120 most the edges because they were pretty thick. I wanted to run more micro over it but felt that would get me in a never ending cycle so my hope is the Professional Paint Shop I plan on going with has a process they follow. I did do a 'final' skim coat and then got working with the UV Smooth prime product similar on how I did it with the doors.

I had plenty of area's to patch and clean up. If I did micro, I always followed that with a skim coat and then I followed that with a UV Smooth Prime application.  I may have been creating extra work for myself but I figured I would stick with the method I used on the entire top when dealing with fixing areas. I didn't really take a lot of pictures of this process.  But here is one I took after my first skim coat.

Skim coated entire cabin top
Having essentially the entire structure of the plane complete is amazing!  The cabin top and doors seem like a huge hurdle to get through.  I didn't anticipate it being easy but I couldn't fathom what took so much time... well now I can.  Someone asked me the other day when this thing will be done, my typical answer has always been in about two or three years... I'm going to change that answer now to a year or two. There is still plenty to do but I feel as if I'm at least halfway done. Maybe I'll self impose a goal of being in the air by the end of next summer... if not the air, then at least the airport.

Below is a picture taken this morning.  To the keen observer it's noticeable that the doors haven't been smooth primed yet. That's going to be done over the next week, while I also try to figure out how to get the gear on... so wanted to at least have a picture before she's standing on her own legs.

Doors & Windows!

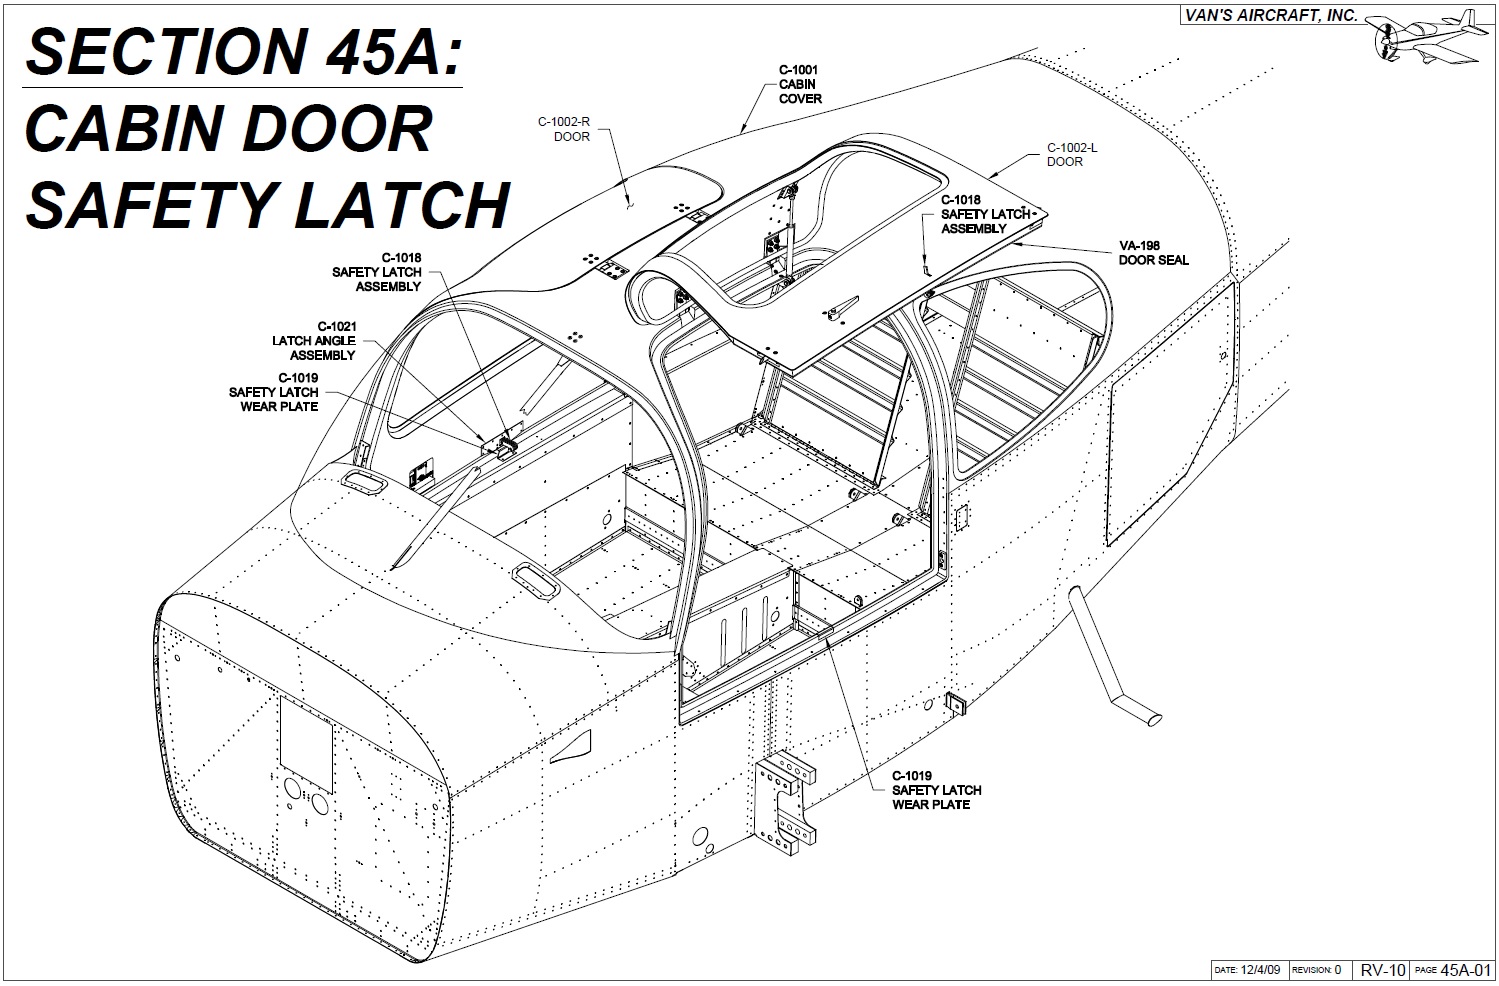
Bonus: Cabin Door Safety Latch

I didn't do this section but for those interested in building an RV-10 wanted to include it for congruity's sake.  If you don't go with Plane Around or another 'off plans' solution for the door latch you would end up doing this.  It's not pretty but it apparently keeps the door from flying open so that's a good thing.  The RV-10 I flew in had this and you essentially turned the door handle and then hand to move the latch to get the door opened.  Easy enough...

Section 45A

Thursday, June 1, 2017

New Month New Tail Number, Ordered Engine and Propeller

New Tail Number


Less than 6 months ago I talked about reserving tail number N910W, which was exciting because it made more sense than my previously reserved N405JW. However I always had my eye on another registration number and I'm happy to report that I successfully registered the number to my first choice of N10JW!  How did I score such a fine number 10 for RV-10 and JW for umm my initials... Well I set up a 3 year calendar reminder on the previous 'purge' date to be the first one up if it becomes available again.   Well 2016 was a bust, it was renewed before the purge date.  However last month I received the reminder but was in the middle of something before I could check, forgot about it until one night I was doing some reading and frantically checked expecting it to have slipped another year.  Surprisingly it was 'available' so I promptly registered it.  I used the quotes because there's always a few week waiting period wondering if you really get the number of if someone submitted the request before hand and the FAA just hasn't gotten to the request yet.  However two weeks later the registry site now has my information.  Will have to keep up though with my purge date to make sure I don't lose it!

Engine & Propeller


If you read my previous engine and propeller discussion here then you know that I have settled on going with a rebuild vs brand new engine. You also know that I'm going with the 3 Blade Hartzell prop and taking that one step further I now have both the Barrett Precision Engine and propeller on order. With the engine I decided against going with the cold air induction.  I like the system but you'll end up spending en extra $5K or so for the engine and then you need a show planes cowling (Or maybe some extensive fiberglass skills) and then with the show planes cowl a different spinner.  I really like the look of the Vans cowling with the snorkel so I decided to go with the Ram Air modification instead. It's essentially going to do the same thing, either cold air or more air.. to increase manifold pressure.

With the propeller everything is fairly standard.  The engine will be a wide deck so the governor from Vans will work.  If you're doing something different make sure the prop, engine and governor all line up.  Other than that the only off plans thing with the prop is that you use an aluminium spinner from Vans.

Back to these doors/cabin top.  I'm so close to wrapping it all up!!!

Tuesday, May 30, 2017

Firewall Forward Kit


Quick update because I haven't seen a lot of information out there on it.  The Firewall Forward Kit is what you order after your Finishing kit and consists of all the little odds and ins you'll need while installing the Engine.  But like everything else with this build you can go completely per plans or decide to remove or add a few things.  Since I'm going with the Ram air system, braided lines and different alternators I had to remove some things.  Here's essentially what I removed from the kit.

Removed-

  • 1.000 VA-186 (Already had)
  • ES Alternator Deluxe
  • FAB-360/540 (And all associated pieces)
  • EA OIL COOLER 20006A
  • 1.000 CT BLK THROTTLE 47.5 S9C 10 (I(O)-540)
  • 1.000 CT BLUE VPROP 72.5 S9C 10 (I(O)-540)FWD GOV
  • 1.000 CT RED VMIXTURE 51.5 S9C 10 (I(O)-540)
  • VA102
  • VA119
  • VA133
  • VA135
  • VA138
  • VA189
  • VA190


This obviously dropped the price down a bit but the big money items are things like the exhaust and prop governor so you're not going to get the price down all that much.  On that subject make sure you get the correct governor for the prop/engine combo.  I'm going with a Wide deck with a Hartzell so will post about that later, I've did read some things about mismatched combos that can really ruin your day, so make sure you're getting all the right parts.  Anyhow I ordered the FWF kit a few weeks ago, got it inventoried and organized in a few hours and now it's awaiting the engine install.

Unpacked and inventoried the exhaust

Rest fit on the middle shelf

Monday, May 8, 2017

Cabin Doors & Transparencies - Part 3

I'm 100 hours into the finishing kit and have yet to escape section 45.  This is mostly due to the doors, modifications and some mess ups.  The doors I would put so far as the most difficult part of the build.  If you're really good with fiberglass and fittings then you probably won't have an issue.  But between the sanding, fitting and all the little pieces I've had my share of issues.   As mentioned before I went with the Aerosport Low Profile handle and the Plane Around 180 degree door kit with center locking cam. Worth it but it just adds time to your build.  100 hours in and I'm still on section 45.

Shown below are some random pictures of the doors.  These were taken before I cut and tapped the stock Vans rods.  I ended up fully extending them, marking the location and then cut about 5/8" past that to accommodate the new pins.  I also had to tap the hole which went a lot easier than I expected.


Here are some random pictures I took of the inside delrin piece for the cam as well as the delrin piece on the cabin frame.  One thing to note is I don't think there's a good way to determine where the pins go into the cabin top.  I tried the Vans method of using a sharp bolt and drill there... that resulted in the rear pin being off and the door being about 1/8" out. Cause me to post this on the Vans board.  I ended up making essentially a doubler to ensure the door didn't joggle around.  On the left door I tried two different methods both resulting in a bit of manual hole modifying to get it to sit correctly.  I'm going to go back and make some doublers for those as well but in reality I'm not sure if they're actually needed.  Even if the delrin wears out and the door shifts 1/16" -1 / 8" outward the center cam will keep it in place. Maybe I'll try some milled fiber and expoxy vs a doubler...


When the doors or shutting then you make something to mimic a compressed strut in order to find where to put your mounting hardware for your door.  Below is a picture of the 4 bushings I made, the wood 'strut stick' and the 4 hinge pieces for the door.  After priming the hinge pieces I had to reduce 2 of the bushings down to 3/8" to accommodate the Plane Around strut attachment pieces I installed when I put the overhead in.


End result is functioning doors!
So what's left?  Well two primary things, one is size everything to fit the Mcmaster Carr door seal and a lot of fill/sanding/fill routine to get everything smoothed out and the door reveal where I want it. A while back I thought I had fit the door seal but after handing the doors I noticed several things.  One is I cut way too much off the bottom, it was down to about a 1/2" and what I really wanted is 1" on the sides and bottom and 1.25" at the top.

To make sure I was measuring everything the same I made two little sanding/measuring tool type things.  One for the sides and bottom and the other for the top. These gave me the quick ability to run it along and see how much I needed to take off and what area's I had to build back up.  To my surprise I only had to build up the bottom and one 6" on the right front.  Everything else I was able to just said down to the right dimensions.


Took some pictures of how I did the build up.  Pretty straight forward I made some back pieces out of cardboard and tape.  Pushed this up against the frame and drew the 1" up so I knew how much milled fiber flox I needed.  When with milled fiber for the strength and the ease of use.


Low bottom lip
Cardboard form

Milled flox and peel ply
Ready for trimming


Post sanding
 After I had everything to the exact specification I decided to throw about a half inch of some fairly stout fiber glass tape to further reinforce the edges and give me a bit of a hump that I can contour out later. Pretty typical process of wetting the fiberglass, putting on the tape and wetting out the tape further.  After I bit put some peel ply on it to cure.  The end result was solid.


The next step is to make sure I have a uniform gap of 1/4" between the inner door and the channel.  I will sand or build up where I need to.  Then I have to make sure the lip can fit seal so that also has to be 1/4 inch.  I will sand or build up on the inside where I need to.  Then of course all the micro fill/sanding to smooth out the door channel, interior area's I've fouled up and then place the seal on.  Then I'll move onto the rest of the cabin top exterior and door interiors. 

Saturday, April 29, 2017

Cabin Doors & Transparencies - Part 2

I have been traveling frequently for work which eats up entire weeks at a time.  In several cases weeks at a time.  My job makes this build possible, so maybe in an indirect way it's a building activity... All the travel has made the last few months of building sporadic, often ending up finding little things to do but not doing big needle moving changes... and I'm still on section 45... I did complete the initial glassing of the windshield fairing. It's extremely ugly right now but I wanted to wait until I get the doors on and latching before working the external cabin top.


Windshield Fairing peel ply'd
Working on the door latching I did a terrible job documenting the process.  It's actually a bit confusing because I'm using the some of the stock parts, the Aerosport flush mount handle and finally the PlaneAround 180 degree latch kit.  During the 15 or so hours I've spent on these it was broken up by numerous days and it was enough to juggle between the three different set of instructions figuring out what I need to do and when.

I'm also using cam locks by FortX vs the ACS locks that I think the handles were designed for.  So I had to do some trail and error engineering to get it to fit flush on the outside and function on the inside.  My end solution was to split a rubber grommet and shape it into a gasket that fit around the lock making it proud enough to line up flush with the glamour plate of the handle kit.  Again I didn't take any pictures of the process but you can see the end fit on a picture.


Working handles
Door slotted
Exterior handle, with lock
Interior handle, with lock

I still have quite a bit to do.  I am filling some time working on things like the tires, brakes, engine mount ect.  But will wait till those sections to post the pictures.  On the door it's mostly the inner workings and get them on the plane.  Hope to have that done in the next week or so, before I go out of town again.