Friday, December 29, 2017

Holiday Panel and Electrical Design

Panel

It has been close to a year since I originally posted my plans for a panel, electrical system and component location.  With 2018 around the corner I wanted to get the new year's designs out before the end of the holiday season.  So without further adieu, I present the N10JW 2018 Panel!

I have been working with Stein Air the last few weeks on this design and we went through 7 revisions to get to this.  Very easy to work with, might have helped that I had a mock up put together to start with.  Should note the labeling isn't accurate to what will be on the panel.  I'll continue to work with them on the atheistic parts, this picture is all about functionality.  Here are some of the substantial changes from my old design-

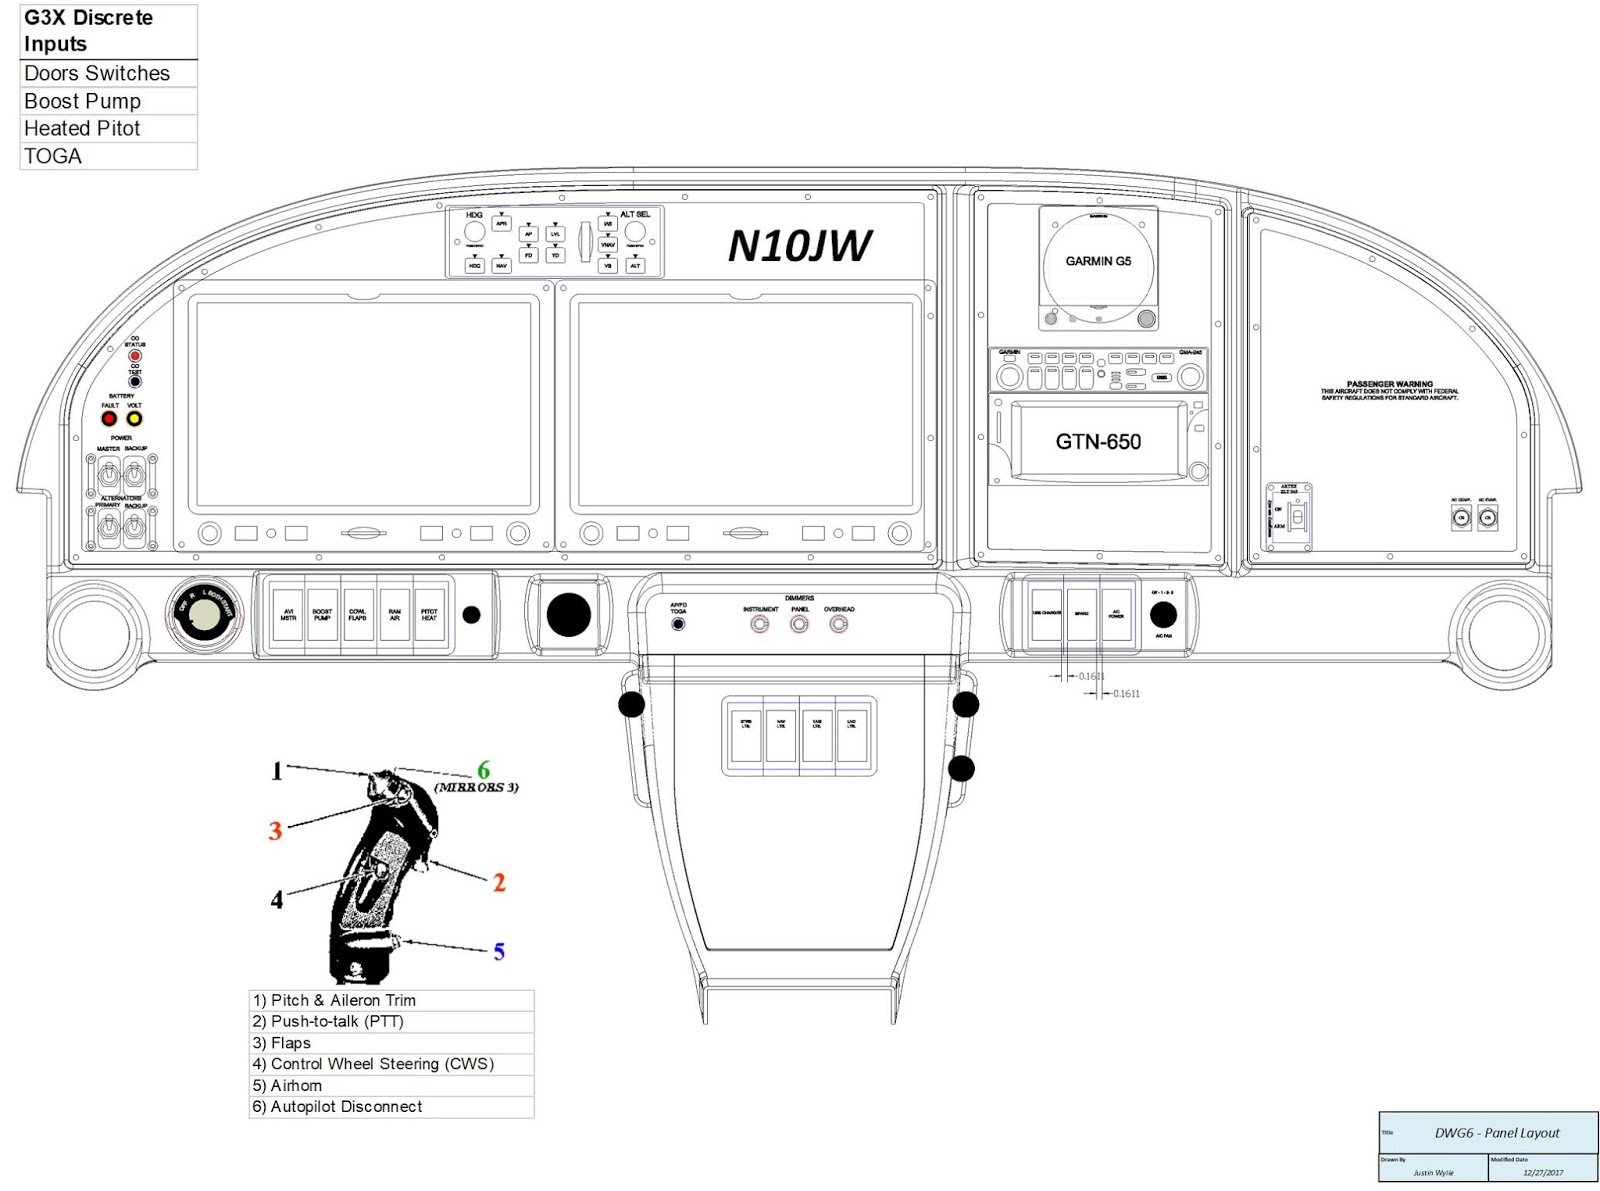
  • Replaced my overly complicated Mag switch / start sequence with a tried and true ACS style key switch. While I liked the idea of holding two toggles up to start, it's a bit too complicated and not as easy as turning a key.  Push button would also have been neat, but then there's still a mag sequence to start..  in the end ease of use won.
  • Incorporated both the CO2 Test and warning light as well as a low voltage light and battery fault (EarthX Battery).  My original idea was to see these errors on the PFD, but if there's a battery issue and it's not powering on then I can see the fault light.
  • Removed Autopilot Power switch because I determined it's not needed.  If I can't turn the servos off via the autopilot panel at the top, or withing the G3X or manually through the VPX then I can always just turn off the avionics (PFD stays on).
  • My light control switches wouldn't fit in the middle section of the panel so I moved them down to the lower console.  That allows me to move the dimmers to the middle panel area which in turn allows me to spread the radio stack out a bit.
  • Added a 'Spare' to the left of the AC power and fan control.  Right now I'm thinking I might wire this up to disconnect the Co-Pilot stick buttons. Default would be just to have it off unless someone is flying from the right seat.
  • Added two traditional Circuit Breakers for the Air Conditioning. The AC pulls a lot of amps and no reason to route it through the VPX.  Instead I'll use traditional push-pull CBs for the power.
  • The only other real change involves the mapping of the control stick buttons.  I wasn't sure what I wanted to use for button 5 on the Infinity sticks until I cam across this... which helped me make my decision.


Electrical Design

Periodically over the last year I would get into my Visio file and do updates to my previous baseline.  Most the time it was the panel, but lately as I started to hone down on some decisions it's been to the other more important sections, ie component layout and power distribution.

I finalized on going with a dual alternator and essentially a limited dual battery system.   I call it limited because in case of battery, contactor or a VPX failure, my backup battery will only power up the PFD, engine and direction components and the GTN 650 GPS and comm system.  Now if this all takes a dive then I have a G5 to help keep my wings level.  All this really only matters if I'm in the clouds and can't see the sky or the ground.  This set up should give me a few hours to get out of the weather and on the ground.  The balance of simplicity with redundancy is something I focused on and am happy with my design.

I'm in what I would call the 'white gloves' phase of my design planning.  The major stuff was in there just needed to QA it a bit more and be methodical about it.  The first part was to get into my component drawing and remove or adjust anything that I know I don't plan on installing. The only major component I took out was the secondary ADAHRS (GSU 25).  I learned the G5 can and will perform this function, sending info to the G3Xs if the primary ADAHRS goes down. This is a simple enough drawing that it's easy to change on the fly and adjust as needed.
Component Layout
Next I jumped into my VPX Planner and ensured I have accurate Max AMP draws and circuit breaker values.  I say Max AMP draws because you want the circuit breaker to be able to support it, even though your typical pull may be different.  Strobes are a good example of this, they obviously draw power in bursts vs a constant drain. This is important when sizing your alternator.

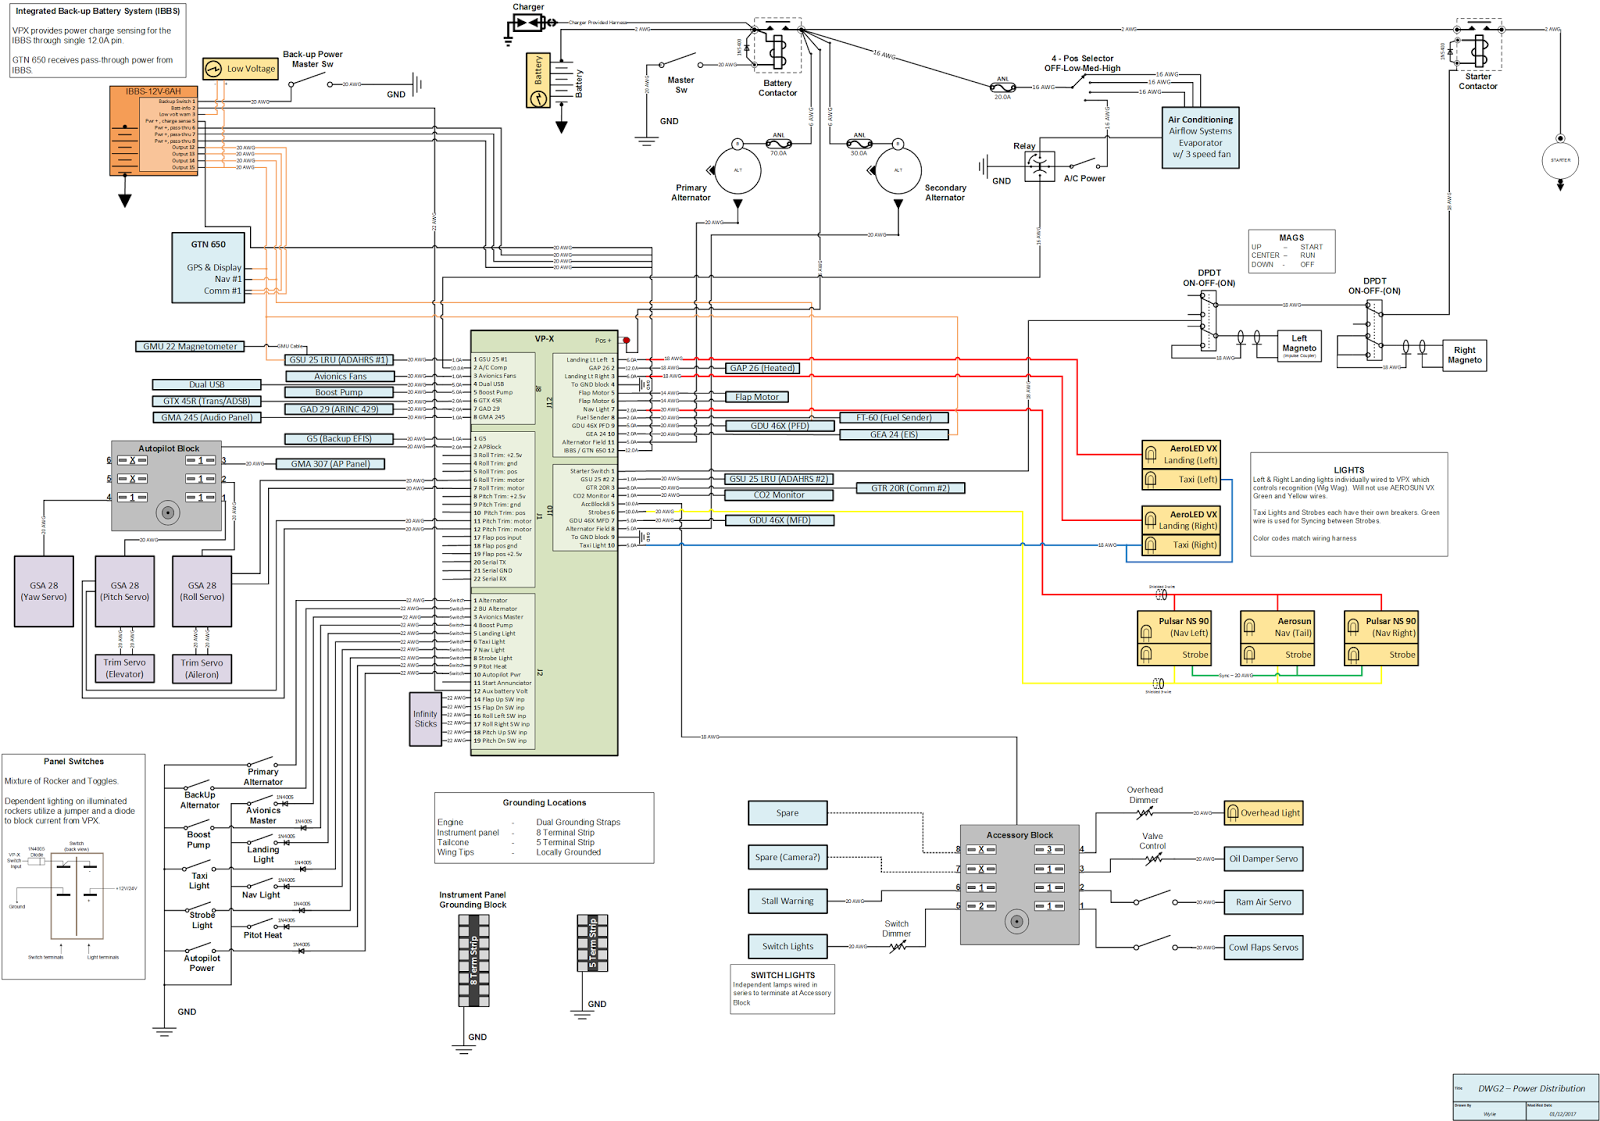
After I worked through the two above items I got to the meat of the work and that is updating the power distribution drawing.

Update - When I posted this originally a few days ago it was based on the assumption that each landing light would only need a 5.0A breaker.  After talking with Jesse over at Saint Aviation he suggested I keep them at 10.0A each.  I highly respect Jesse's knowledge and expertise on the subject of RV's so I had to do some modifications. That's really how fast these things can change, I fully expect this to continue to change until the plane is up and going.


RV-10 Electrical
A lot is going on in the above drawing, but if you know a bit about what you're looking at it starts to make sense fairly quick.  The idea is that if someone who didn't build the plane needs to know how things are connected they can view this schematic and get up to speed. As the builder, even though I haven't ran a single strand of wire yet, I have a path and plan to how from a power perspective things are connected. You're limited to 32 power pins off the VPX so most will supplement with a fuse block of some sort in order to provide power to non-critical flight items.

Tuesday, December 19, 2017

Pushing On & Partial Move

Pushing on!

Congratulations to me on becoming a Hyatt Globalist this year! Unfortunately that means I've been on a lot of work travel over the last few years, which adversely affects the time I've had to work on the project.  Sad to say it's been 3-months since I completed a major evolution, however when I'm in town I try to continue pushing forward, racking up some hours and getting closer to the proverbial finish line.  Most everything in terms of time is going in the 'finishing' section because I made the assumption that interior, avionics, AC and such are 'finishing' type items.

As I await the engine to be assembled, tested and crated for me to pickup (Hopefully this week) I've been working through some other tasks over the last few months-

  • Panel Revisions - Last January I had a panel design that I really liked.  In the end though I decided to try and simplify it as much as possible and am currently working with SteinAir on finalizing the layout.  The equipment has stayed the same for the most part but I removed my overly complicated Mag switch and starting sequence and decided to go with the standard ACS style key and starter.  I also removed the AP Power switch given that there are several ways already to turn off the AP if there are issues.  Lastly where I thought I was going to have the light switches, in the end they won't fit so those will move down.  Still in the process but looks more like this now-


  • Electrical Drawing - Also last January based on my anticipated equipment and configuration I put together a very detailed power distribution drawing along with a Visio book containing all sorts of other documentation. Have been working on this, I've gone back and forth between some ideas but again to try and simplify things as much as possible with still providing a good level of redundancy, I've made changes.  I'm still thinking dual battery (One being an IBBS), dual alternator and if all else fails the Garmin G5 with it's own backup battery.  The G5 also acts as a backup ADAHRS.  Between all these, if I'm in IFR and things start going south I should have enough redundancy to get me out of the clouds and someplace safe to land.
  • Interior Panels - I started receiving my order from Aerosport a number of weeks ago. I have some experience working with plane plastics so I'm somewhat comfortable working with them.  My process is get everything fit and installed.  Then I'll go back through and remove everything, refinish it and when able reinstall the parts.  Some parts such as the rear panels can really go back in immediately, where the forward kick panels can't be installed again until after Avionics and wiring is all finished up. Here are a few pictures of the fitting process-


Partial Move

My 3-car Aeroplane factory is getting a bit crowded again.  With the engine coming I decided to go ahead and move the wings and the horizontal stab to the Hangar. This frees up the shelving above my garage to store some parts and clears out a bit space where the 15' long wings resided. Several things had to happen for me to do this.
First off my hangar was a bit of a mess.  On one side there was all sorts of odds and ends from our 172 restoration project. On the other side there was a grave yard of old broken ripped out parts from an A&P we once used.  I've tried for years to get him to get the stuff and decided to finally just trash it. I also wanted to move one of my long workbenches, a tool chest and some other things to start prepping an area to final assembly the project.  After about 6 hours I had cleaned it up, celebrated with an hour long flight in the 172 and then snapped a picture before putting the plane back.


Moving the wings was a bit more of an ordeal.  I rented a 17' box truck with the intent in rolling the wings up the ramp and strapping them down.  A friend of mine came over to help and I'm glad he did.  The ramp was about 1/2" too narrow... or I guess maybe I mounted the wheels a 1/2" too wide.  Either way, him and I had to lift the wings and cradle into the back of the box truck.  Once strapped down there was about 1" clearance between the end of the cradle and the door.  Happy to say the wings made the 20 mile trip with no issues and they now live at the Airport.