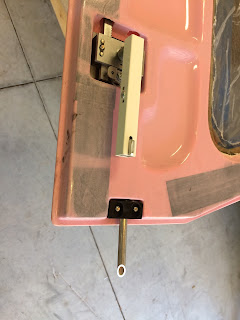
Shown below are some random pictures of the doors. These were taken before I cut and tapped the stock Vans rods. I ended up fully extending them, marking the location and then cut about 5/8" past that to accommodate the new pins. I also had to tap the hole which went a lot easier than I expected.
Here are some random pictures I took of the inside delrin piece for the cam as well as the delrin piece on the cabin frame. One thing to note is I don't think there's a good way to determine where the pins go into the cabin top. I tried the Vans method of using a sharp bolt and drill there... that resulted in the rear pin being off and the door being about 1/8" out. Cause me to post this on the Vans board. I ended up making essentially a doubler to ensure the door didn't joggle around. On the left door I tried two different methods both resulting in a bit of manual hole modifying to get it to sit correctly. I'm going to go back and make some doublers for those as well but in reality I'm not sure if they're actually needed. Even if the delrin wears out and the door shifts 1/16" -1 / 8" outward the center cam will keep it in place. Maybe I'll try some milled fiber and expoxy vs a doubler...
When the doors or shutting then you make something to mimic a compressed strut in order to find where to put your mounting hardware for your door. Below is a picture of the 4 bushings I made, the wood 'strut stick' and the 4 hinge pieces for the door. After priming the hinge pieces I had to reduce 2 of the bushings down to 3/8" to accommodate the Plane Around strut attachment pieces I installed when I put the overhead in.
 |
| End result is functioning doors! |
To make sure I was measuring everything the same I made two little sanding/measuring tool type things. One for the sides and bottom and the other for the top. These gave me the quick ability to run it along and see how much I needed to take off and what area's I had to build back up. To my surprise I only had to build up the bottom and one 6" on the right front. Everything else I was able to just said down to the right dimensions.
Took some pictures of how I did the build up. Pretty straight forward I made some back pieces out of cardboard and tape. Pushed this up against the frame and drew the 1" up so I knew how much milled fiber flox I needed. When with milled fiber for the strength and the ease of use.
 |
| Low bottom lip |
 |
| Cardboard form |
 |
| Milled flox and peel ply |
 |
| Ready for trimming |
 |
| Post sanding |
The next step is to make sure I have a uniform gap of 1/4" between the inner door and the channel. I will sand or build up where I need to. Then I have to make sure the lip can fit seal so that also has to be 1/4 inch. I will sand or build up on the inside where I need to. Then of course all the micro fill/sanding to smooth out the door channel, interior area's I've fouled up and then place the seal on. Then I'll move onto the rest of the cabin top exterior and door interiors.


No comments:
Post a Comment
Note: Only a member of this blog may post a comment.