After 150 hours or so of fun, frustration and learning my journey with section 45 is coming to an end.
N10JW now has functional doors, a windscreen and windows! For write up purposes I split the Doors, Windows and Cabin top into separate sections but they are very much intertwined activities.
The time spent on this section was a round robin routine of trimming, sanding, filling, glassing, sanding, filling, priming, filling, painting, filling, sanding... you get the picture. Some areas were more of a challenge due in some part to my own mistakes or oversights. I also increased the difficulty over a regular plans build because of added parts such as the 3rd door cam latch, flush exterior handles and the McMaster Carr Door Seal. At the end of the day that's what is great about experimental aviation and that you can customize your build how you want. The doors are literally something that you will use at least twice every time you fly so you want to be happy with what you did.
Cabin Doors
Last I posted I had the doors initially fit and working but still there was still plenty of details I had to work out before calling them 'done'. After I completed the door flange trimming so I have an even 3/16th gap around the cabin top there were several places on the doors that I had to reepoxy. I just mixed up some flox and pushed it in with a stir stick. I tried to use a syringe but found that more trouble than it's worth. I also didn't like the gaps I had where I installed my delrin door ends. Using some tape as a barrier filled the gaps with some micro, let it sit a few and then topped the area off. Seemed to work well and gives it a more finished look.
Finishing the inside of the doors I filled any noticeable gaps while sanding out any random rough spots and slapped a skim coat of straight epoxy over the entire inside to get ahead of any pinholes. After curing I blocked out with 120 and then had to use my fingers and some scrap to sand the flanges and nooks on the door. Then it was back to learning...
Up until this point I had finished all my fiberglass with straight epoxy wipes. This went well in battling any pinholes, or other imperfections. On the cabin top inside I had experimented with some high build primer which worked great once I figured out how to use it correctly. For the doors and external cabin top I decided to up my game and try out a new product-
Poly Fiber UV Smooth Prime.
This stuff was suggested by a few builders on the forum but was said to be more of a filler than a primer. There were plenty of mixed reviews and methods of application; some sprayed it, or rolled it, some hated it and some thought it worked great. I decided to roll it using small foam rollers and some foam brushes. The idea behind it is you do 3 light coats rolled on, allowing it to dry in between coats, sand it and then do another 3 coat. Apparently the key is to let it dry really well. Experimented with the first coat and it seemed to take about 10 mins to dry to the touch. So put on 3 coats and let it cure over night.
 |
| UV Prime |
The next day I spent some time sanding this stuff... by 'some' time I probably have a good 6 hours of sanding the doors and cabin top. This stuff works really well but I didn't have a ton of pinholes. So rather than doing another batch I decided to push on. I could of done the second round of 3 coats but not having many pinholes I didn't want to needlessly waste 6+ hours of applying and sanding this stuff.
With the doors I taped them out and applied my first 3 coats of regular rattle can primer. This is a great way to see any problem area's that you miss and allows you to do any filling or sanding before you get further down the paint process. Here's where I battle with my perfectionist mentality.... I would love to have completely flawless doors, however it's a battle to try to do this. I had this same issue with the cabin top. I would find some little micro flaw in the fiberglass and want to correct it. How I dealt with this on the cabin top interior which translates well to the doors and external areas is stand about 3'-5' away. If whatever I have an issue with isn't noticeable at that distance then I move on. If I can clearly see it then I'll work it out.
Post some micro patch work and sanding I hit it now with several coats of the high build primer and let that cure over night. The next day I again looked for area's of concern, did some more sanding and filling and got it prepared for top coats. For top coats I did 4 coats of color, wet sanded with 1000 grit and then 3 coats of the low-luster clear coat I've been using. Then again wet sand with 1000 grit and it gives it all a nice finish.
 |
| Coat of primer |
 |
| Post sanding |
 |
| Post 3ish light coats High Build Primer |
 |
| 4 coats color |
 |
| 3 coats clear |
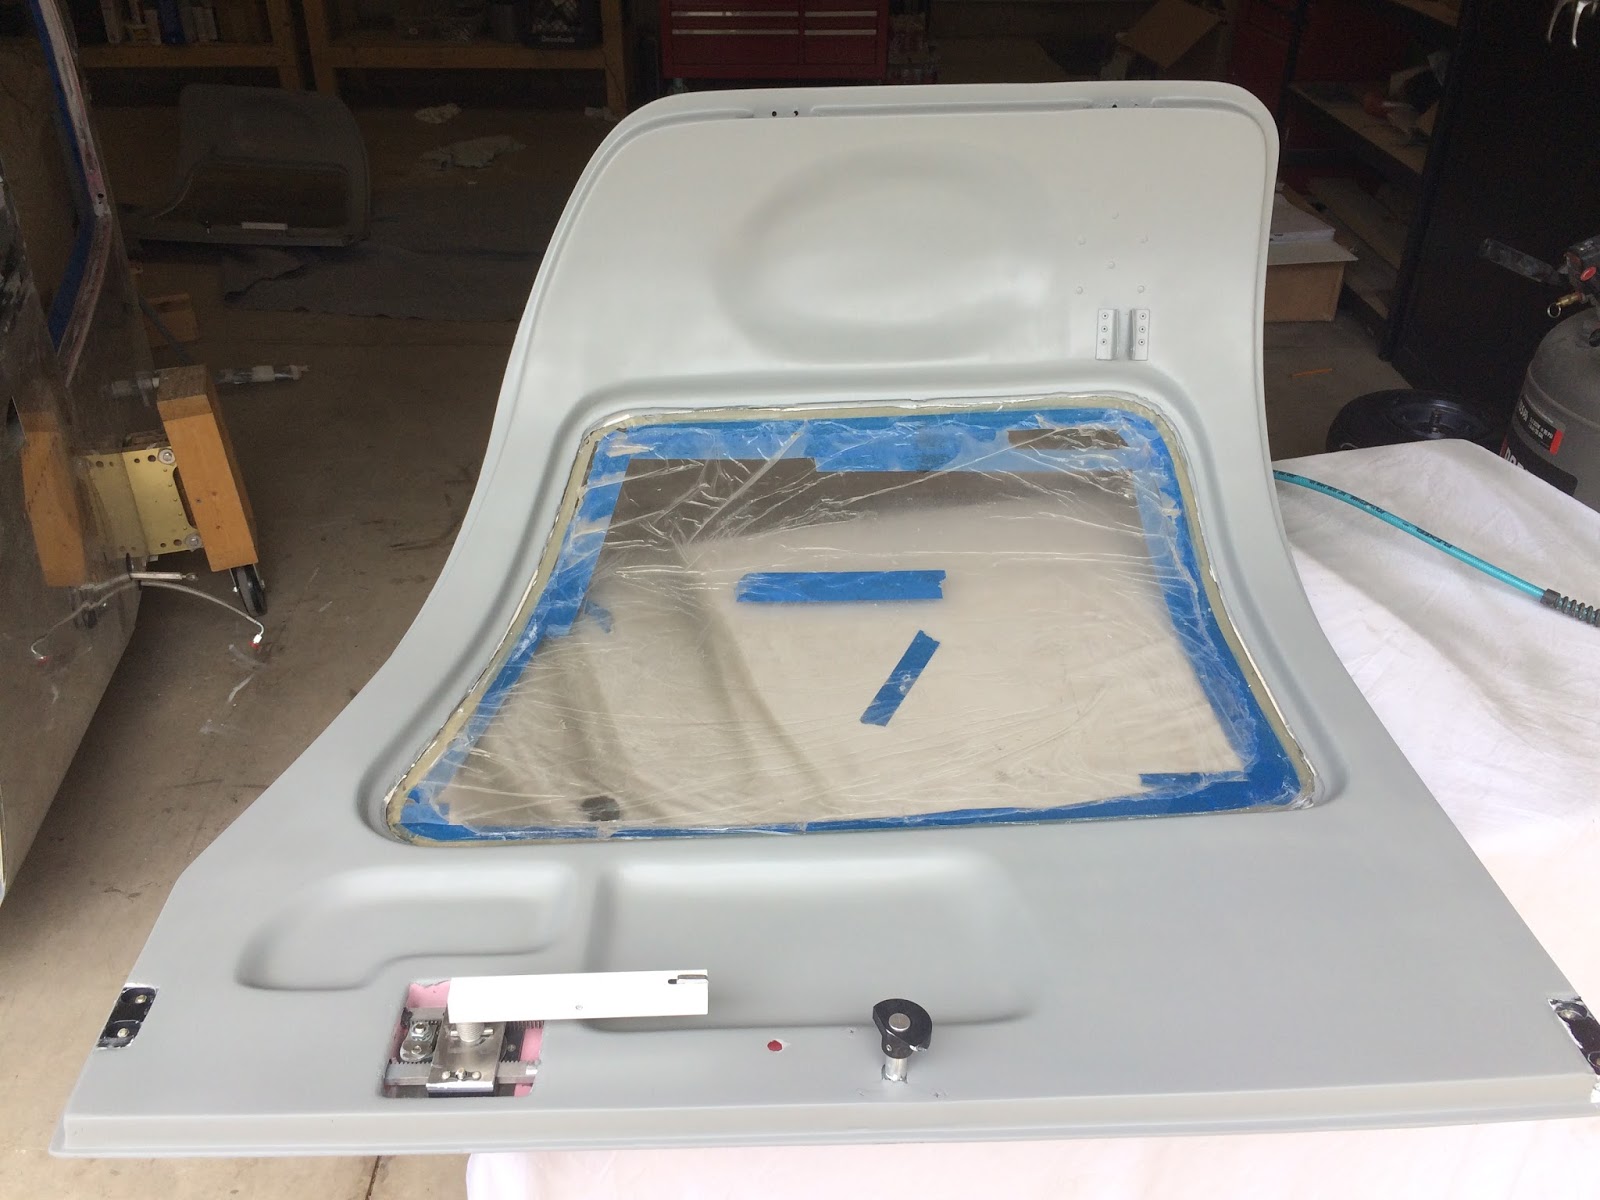
I think the doors turned out great. They are not 'Perfect' but they look clean, the color turned out well and there's no major flaws on them. There is a bit of a textured look to them which helps to blend in minor imperfections. At the end of the day they'll work well in the plane and will be easy to fix down the line when they get scratched from use. If I had to critique my work I could of done a better job in the rattle can painting department. You can noticeably see some area's are more shiny than the others. Once I add the final touches on the inside like the handle cover, some window trim and black out some of the white area's on the Delrin it will look much better.
 |
| Tape Removed, will install finishes later |
Transparencies and Cabin Top Finishing
Hard to document this process. I bounced around on various tasks for practically months. The issue is you might work for an hour and then have to wait a good 18-24 hours before you can work on that part again. The windscreen fairing for example involved a good 3+ coats of micro, 4+ coats of epoxy and an applications of UV Smooth Prime. Plus there were some area's I refilled and patched filled and what not. If done on consecutive days it would still probably take a few weeks.
Getting into it from the rough layup around the windscreen involved me making a sanding block out of a scrap piece of wood that was approximately a 7" radius. This is what I used along with some adhesive sand paper to start the process. This gave me a rough curvature and showed me just how much micro fill I needed (A lot). Mixed up about 3 servings of the stuff and lathered it on really thick around the entire fairing. I think covered it with Tin Foil and using the sanding black pushed it all down into place. Now in hindsight I should of put peel ply down and then the foil but was under the assumption that the shiny side of the foil wouldn't stick... that wasn't the case.
After curing and picking out all the little pieces of foil I hit it again with the sander, much better shape but needed more fill. After a total of 3 iterations it had a decent shape. I then blocked out the sides and worked that transition from the sides to the fairing which is more of an art project than building. After that I tossed down a straight epoxy coat that I had dyed black to really show any low spots (Low spots won't be shiny when sanded). Once that was done I put on some white micro to fill in any low spots, let cure and then sanded again. Using a flash light and my hands I went over it once again and felt it was time for the epoxy coats.
I applied 3 fairly thick coats with a brush and sanded in between each with 120. After 3 coats cured and sanded I moved back onto other parts of the cabin top.
 |
| Final sand and cleaning prior to epoxy coat |
 |
| First coat |
My approach to the rest of the cabin top was to first finish out the door frame. Like everything else when dealing with fiberglass this was a series of steps that included sanding, micro, epoxy, ect. Since I had the 1/4" gap I wanted between the door and the flange already that mean any material removed or added had to come from the back of the frame. The original plan was to have the flange 1/4" thick for the gasket. The problem though is I had already finished the cabin top interior so building on that would cause a blending issue, not to mention a lot of refinishing, which would be more challenging given the the top is secured to the fuselage.
What I decided to do was scrap my original seal which was fairly beat up anyhow from previous installations on larger that 1/4" thick flanges. Instead of going with the original one I previously ordered I picked a new one, the only difference being that it only requires a 3/16" flange. Going this route saved me from having to build up a large area on the back of the flange and instead allowed me to just sand down the back of the flange to get the 3/16th consistence... and hey maybe I saved some on weight too!! I did however still have refinishing part of the inside area for the flange but really not much more than 3/4". Taped it out, went through the sanding, filling, painting sequence and not it looks good if not better than it had before. For the time being the seal is just slipped on. Post exterior paint I will use some silicon sealant just as an extra moisture barrier.
 |
| Flange with Seal on |
 |
| Top |
 |
| 3rd latch Cam with door secure |
Moving onto the rest of the cabin top you just have to realize it looks extremely large but the largest area's are easy to block. So in reality the sections you have to focus on are the area's around the windows/windscreen, the door gaps and elevations. This still takes quite a bit of time and literally kept me up at night. To help keep myself in check I focused on area at a time, otherwise I felt rushed to get to the next section. So I would work out a window, then take a break... move onto another one, or wait till the next day. This round robin routine helps keep the project moving and before you know it you're finishing out some sections.
The door gap was a back and forth event as well. I wasn't 100% sure what I wanted to do with the cabin top edge and how I wanted to space it out. What I ended up doing was building it up and essentially squaring it off with some micro. Then I used some scrap aluminum which was about an 1/8" round and just held some sand paper in place and used it as a guide. Worked out moderately well, still ran some 320 over it and did a skim coat along it by hand. To get the door gap spacing I used a 'gator' pad and a small pieces of thin cardboard and just ran it around until there was around a 3/32 or so gap. This is probably +- 1/32" in some areas but post paint I doubt it will be noticeable at all.
 |
| Rounding and gap |
 |
| Uniform gap |
The rest of the time was spent working all the edges, to include removing the first layer of tape I put down. I had to feather with some 120 most the edges because they were pretty thick. I wanted to run more micro over it but felt that would get me in a never ending cycle so my hope is the
Professional Paint Shop I plan on going with has a process they follow. I did do a 'final' skim coat and then got working with the UV Smooth prime product similar on how I did it with the doors.
I had plenty of area's to patch and clean up. If I did micro, I always followed that with a skim coat and then I followed that with a UV Smooth Prime application. I may have been creating extra work for myself but I figured I would stick with the method I used on the entire top when dealing with fixing areas. I didn't really take a lot of pictures of this process. But here is one I took after my first skim coat.
 |
| Skim coated entire cabin top |
Having essentially the entire structure of the plane complete is amazing! The cabin top and doors seem like a huge hurdle to get through. I didn't anticipate it being easy but I couldn't fathom what took so much time... well now I can. Someone asked me the other day when this thing will be done, my typical answer has always been in about two or three years... I'm going to change that answer now to a year or two. There is still plenty to do but I feel as if I'm at least halfway done. Maybe I'll self impose a goal of being in the air by the end of next summer... if not the air, then at least the airport.
Below is a picture taken this morning. To the keen observer it's noticeable that the doors haven't been smooth primed yet. That's going to be done over the next week, while I also try to figure out how to get the gear on... so wanted to at least have a picture before she's standing on her own legs.
 |
| Doors & Windows! |
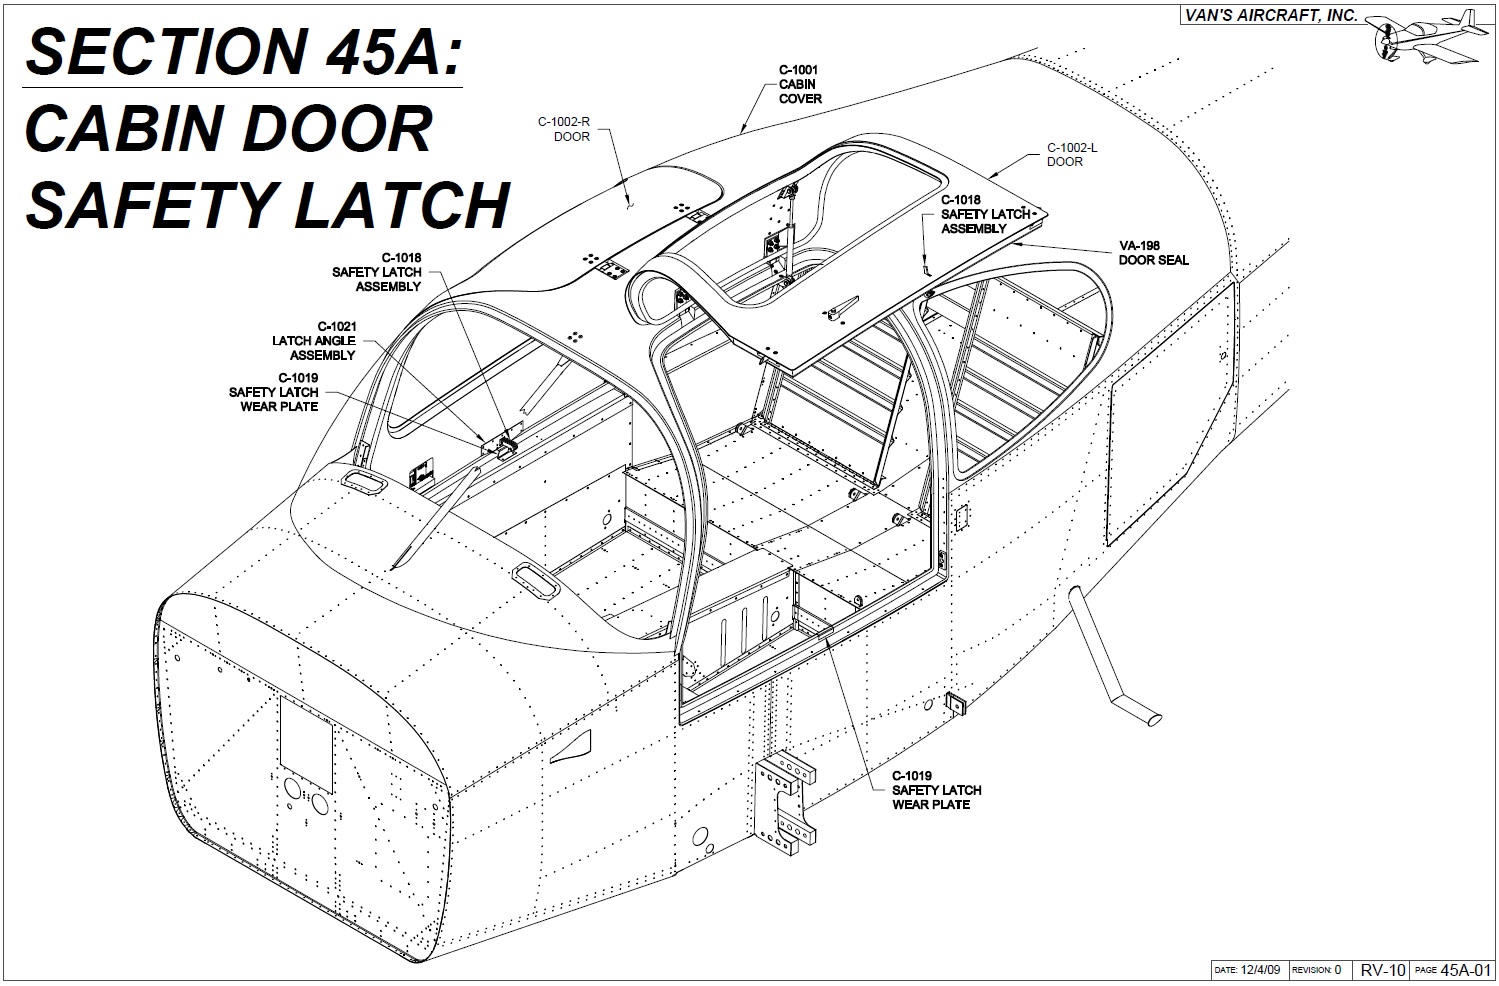
Bonus: Cabin Door Safety Latch
I didn't do this section but for those interested in building an RV-10 wanted to include it for congruity's sake. If you don't go with Plane Around or another 'off plans' solution for the door latch you would end up doing this. It's not pretty but it apparently keeps the door from flying open so that's a good thing. The RV-10 I flew in had this and you essentially turned the door handle and then hand to move the latch to get the door opened. Easy enough...
 |
| Section 45A |


No comments:
Post a Comment
Note: Only a member of this blog may post a comment.