Happy 2nd Birthday!
Today marks exactly two years since I started on this journey. Looking back it was a bit overwhelming to get into. Being a PM by trade I'm extremely methodical in my approach to projects, so it's out of my comfort zone not to have a relatively complete mapping of everything before I start. Unless you're on your 2nd or 3rd Airplane build I don't see how it's possible to do that. So I jumped into it and ordered the empennage kit. Pushing forward I tried to spent a bit of time each week working through the steps one by one and making decisions as they popped up. I relaxed a bit about the quality of my work knowing that everything is not going to be perfect and accepted all the mistakes I made replacing countless parts in the process. You do learn from your mistakes though and everything gets a little easier to do, it's interesting to look back at the angst I had with metal and fiberglass work and now I'm much more relaxed with it all.I originally thought this build would take me 3-5 years. To date I've spent 772.5 hours on the actual build. This doesn't include research, reading or other tasks associated with the build. I was aiming for 500 hours a year, and while I probably do that it's not always on the construction process. It's now time for the major components, Engine/Prop, Avionics, Interior & Final assembly. I'll keep pushing on with it and hopefully finish it within the next year and a half or so. No rush, just constant working pushing towards wheels up...
 |
| Happy Birthday N10JW (Previously known as N405JW & N910W) |
Gear Leg & Wheel Fairings
 |
| Section 48 |
Mains
I didn't do a fantastic job of documenting via pictures. I took random pictures throughout the process but often when I get in the zone of building I just push forward. Below are some pictures of the process. Of importance is using Jacks, lasers and a high quality capacitance level such as this to get everything in level flight mode. I'm not a tool snob but the MD Smart Tool is the most precise, if you're not precise on the leveling you could be off by quite a bit at the end points. This entire process is spent leveling the plane up, drawing lines on the floor and making everything orient in the way shown below;Understanding the orientation you work to get these things to stay in place using duct tape, blocks or whatever you have at your disposal. Some people have made a jig type thing to hold them. I did something similar but if I had to do it over I would of made something much more robust, may have taken a few hours but would of paid off in the end.
I guess one thing you don't really think about with wheel pants are the gear fairings. Apparently these have a greater reduction in drag than the wheel pants themselves and you want to get them positioned correctly. The plans do a good job at walking you through this and you end up using string and taking measurements to get these in.
The intersect pieces I decided to mold into the pants themselves. This should give a cleaner look in the end but it takes a bit of time and effort. You'll want to do an overlap and build up about "1/8 - "1/4 on the forward end so air doesn't get trapped on the back piece and rip it off.
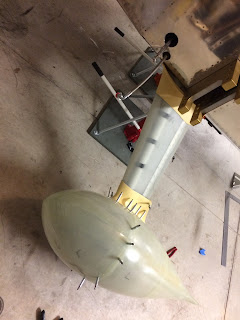
Nose
Compared to the mains the nose was a bit easier. Could be that I had the 35 or so hours of practice with the mains but really the hardest part of the nose was getting the two halves to fit together correctly. That took a bit of time and in the end used some blue tape on the flange and fit the top over checking with a laser and marking the cuts. Then slowly sanded it until I was happy with it. A few other things I did was I waited to final cut the tire opening until they were fitted oh and I followed the instructions with tapping and screwing to get the fit right. Alignment wasn't the challenging since I just show a laser down the center of the plane and did my alignment off that.
I did botch up my standoffs because my drill press struggled to do the holes. Instead of getting new blanks from Vans and starting over I ordered some CNC'd ones that are literally perfect.
Again didn't do a great job of tracking the progress with pictures. As you see above a lot of the time I was doing this in the middle of the night and just working through what I could. As with all fiberglass work you'll spend time finishing these pieces. I used micro to fill in any imperfections and I did skim coats to fill suspected pin holes. Takes a lot of time sanding, trimming, sanding some more... The end result of all this fun is shown below. Glad for it to be done and looking forward to working on the Air-conditioning and some other odds and ends while I wait on the Engine.


No comments:
Post a Comment
Note: Only a member of this blog may post a comment.