
Checklist Updates
Over the last month and a half I've made some solid progress on my pre-move checklist. Some of the items I've made specific posts on and some I've just worked through and didn't feel they needed their own build log entry. Here's a list of these activities with some overall comments.- Wire ACS Starter switch - This wasn't all that bad at first, I just followed the instructions. However after reading about Mag wiring I decided to remove the ground from the ACS and instead utilize the grounding of the actual magnetos themselves.
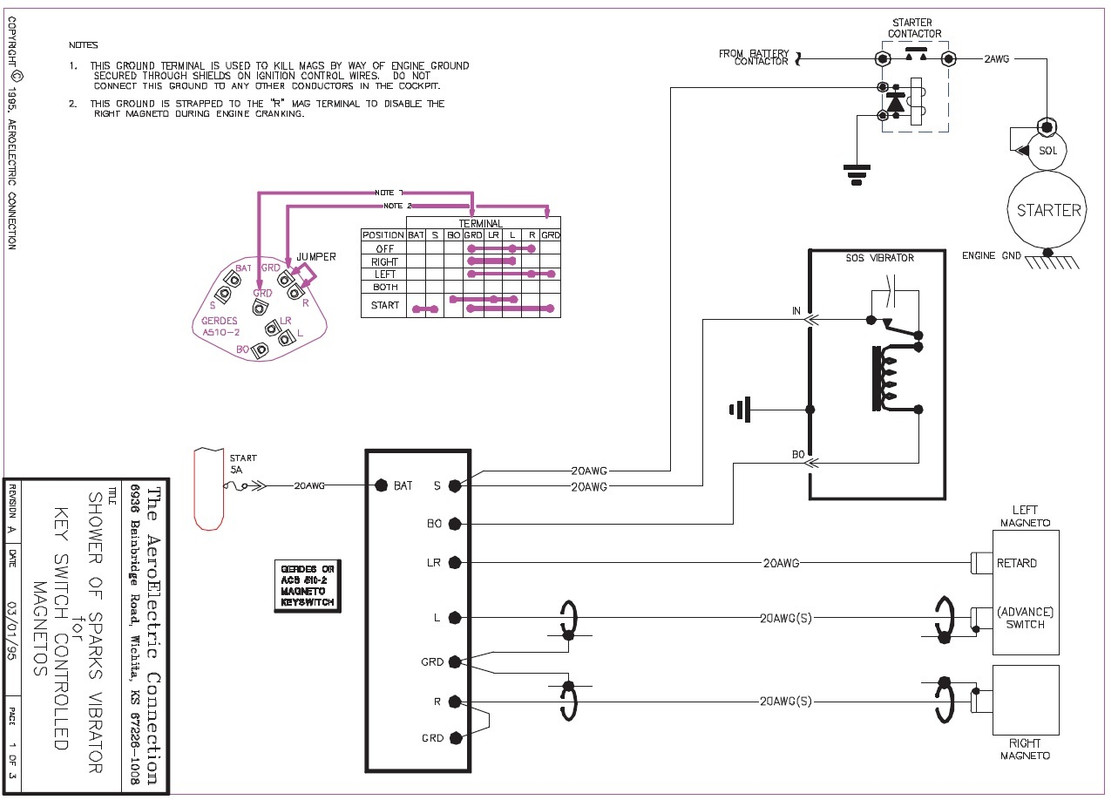
- Wire Magnetos - Something so simple I actually struggled a bit with. I ended up doing quite a bit of research and ordered some shielded cable making essentially my own p-lead. Was strange I couldn't find any Bendix 1200 install pictures but the Aeroelectric book had this diagram that I went with.
- Wire Cowl Flaps - Initially wasn't all that bad, I used Molex connectors and then shielded the wire runs on the inside of the cowl. The pain point was with the switch. Having worked on electrical the last 3 months I realized my original SPST switch was not going to cut it. For these servos to work there has to be a polarity switch. I ended up getting a DPDT switch and figured out the cross wiring to get it to work. The lights don't work as I wanted to but it still lights up enough that I can see it and it functions as I need it to, so not overly worried.
- Wire Door Sensors - Greg Hale had shot me a suggestion this spring on door sensor wiring. Instead of using the relays and sensors that Vans sends with the kit, you can eliminate all that by using 'normally open' sensors instead. This fit my set up perfectly since for the door alarms I'm using the discrete input on the EFIS vs lights on the panel. So I ordered 540-MP201702 proximity sensors and wired them similar to the plans, however I just grounded one end to the bolt. Then I ran and chained all four wires to a single input which I installed into my GEA 24. How it works is if the doors are open the discrete input is constantly grounded therefore alerting me of that on the EFIS. As I close the doors and latch them the magnets in the rod ends break that connection and in turn removes the ground. If all 4 grounds are removed then there's no alert and that only happens if the doors are shut and latched. Very simple.
- Wire Headset Jacks - As I was typing this out, it got very long so I decided to take a few pictures instead. This jist is all connections are located in the center console which made wiring easy and hard all at the same time. I had to watch several videos on wiring these up and then took the time to test each set of plugs and Lemos connections to ensure they all work.


- Wire USB Chargers - I had some issues with some cheap plug in USB charges in my old bird. To ensure I had no issues I waited until the radios were up and going and then messed with the USB chargers. Happy to say no issues even with four devices plugged in. I mounted one on the panel and one on the back of the console for read seat passengers. This is something you only get in first class on United, available on N10JW to all passengers!
- Refinish all plastic panels Interior - I have all my plastic interior panels painted and all nutplates installed for installation. There are several things I need to do though prior to installing these. I did however install some of the carpet, rear seats and such. I'll do a larger write-up with lost of pictures of the interior once it's done.
- Air-condition - I'm working with Bill at AirFlow systems on a new installation method for the over-sized evaporator. The idea is to have the return are on the top baggage bulkhead piece and having that flow directly into the unit, thus improving flow capacity. Then we're working on the delivery air to have the least possible turns for both cabin flood and overhead delivery of air. He sent me some templates to get some dimensions and with a few tweaks they should allow someone to easily mount the evaporator in the correct place and have top notch airflow. The delivery air is going to require some new tooling but all I did was turn one of his same pieces up side down and used some tape to see how it would fit. Maybe that's confusing to read so I tossed a picture of it below.

The Air Conditioning at this point is driving the critical path. I don't want to lose the accessibility by closing out the empennage until Bill finishes the return air design. It's just easier to size and position things looking in from the side rather then being inside the baggage area and looking up. In the meantime I'll keep knocking out stuff as I can.
Control Stick Wiring
The RV-10 I've been flying has about as basic of a control stick as you can get. It has push to talk and pitch trim. Works great and I'm sure was simple to wire but I just wanted a bit more out of a control setup. I went with a set of INFINITY Aerospace grips, because they look great and are completely customization allowing you set up in accordance with your button philosophy.My preferences are pretty straight forward. If it's something I use during critical flight phases (take offs and landings) or if it's something I use all the time (Push to talk) I wanted it on the stick. I also took this a step forward into some nerd territory and programmed my home flight sim joystick with various things and determined what I liked the best. Here's a run down of my choices-
- Trigger - Push-to-talk, because I don't have weapons.
- Coolie Hat - Pitch and Roll trim is fairly standard on these.
- Top Left button - This is the TO/GA switch. I debated a few different things but ultimately I didn't want to take my hand off the stick or the throttle if I find myself 500 AGL in some clouds and needed to go around.
- Top Right switch - I have a momentary two way switch in this location to control flaps up and down. This is out of the way enough that accidental hitting isn't going to be an issue but allows me to have my hand on the stick until I'm on the ground.
- Thumb Button - This is where I put Autopilot disconnect and Control Wheel Steering (CWS), seems the most natural place to have this function.
- Pinkie button - Very strange button that most people seem to use as a push to start function. I didn't want something I would use once a flight, but to be honest I was running out of functions, thought about maybe radio fliping, but I have two radios and I'm somewhat used to doing this on the panel. So because I needed a place for it, this is my Airhorn switch.
Knowing how you want everything is one thing, figuring out how to wire it all is totally something else. It took me a bit to conceptualize my wiring plan for the control sticks. In the end I ran a set of wires to the Pilot side and then behind the panel I solder sleeved additional runs for the Co-Pilot side. The only item not shared is the PTT as there's a Pilot PTT and Co-Pilot PTT. I also didn't want a mess of wires all over the place so I choice to encase the wires for each stick inside some sleeving with heat shrink on the ends. This gave it a clean look and all the runs together. Here's a picture of where it all splits out.

There was some additional construction to the sticks as well that had to be done. First off there's a bit of a clearance issue and what some have done is cut the back part of the control stick to bring it in tighter. I did this, taking about an inch off the back and had to redrill the bolt holes.
Next I decided to go with Stick Grip Pivoting Spacer so I had to figure that out. Now I almost didn't go with this option but when going over my order with JD he upsold me on it. He had some very valid points and assured me that my fear of this thing wobbling around on landings was unfounded. I should note that actually did a test on the RV-10 I'm flying. I made the universal okay symbol and flew around rotating my hand around the stick. I did this on a landing and found I apparently can fly the plane regardless of my wrist position.
Once I had the spacers installed the grips went on easy enough. In full disclosure through I actually had to install it twice. My first go through I didn't want the spacer hanging out the bottom of the stick. However that made the stick a bit too high. Knowing there's a bit of a clearance issue I took it apparent and came down to about as far down as you could. The finishing touch was installing my Aerosport stick covers which conveniently just zip on, hiding both the cable and the bottom of the pivot spacer.

For the most part these sticks are going to be permanently installed in the plane. However there may be some times I need to remove them for maintenance or convenience. In those cases I don't want to have to cut and re-splice wires so I went with the installation of DB15 connectors. I ended up with 12 actual pins. All the switch functions just use grounds, so I could have made it 11 but decided to merge all grounds from the stick to 2 DB pins, which then go to a single wire to the grounding tree. My reasoning is more from a troubleshooting rather than a redundancy perspective. For example if a function isn't working on one stick, but works on the other then it's probably a ground issue. If it doesn't work on either then it's probably a VPX or other issue.


I secured the connections to the gear weldment using silicone wrapped cable ties. Nothing too fancy about it, you just don't want it unplugging in flight or otherwise bouncing around in there.


No comments:
Post a Comment
Note: Only a member of this blog may post a comment.